آموزشکده علم ایران

کمیاب ترین های برترین های دنیا

آموزشکده علم ایران

کمیاب ترین های برترین های دنیا

Pressure-Rendered Chicken Fat

Pressure-Rendered Chicken Fat

A recipe for fat may strike some as strange, but fat is one of the key flavor elements in food. French cuisine would be unrecognizable without cream and butter. Indian cuisine relies heavily on ghee (clarified butter). Chefs in Mediterranean countries turn habitually to olive oil, while those in Tibet always have yak butter on hand. The recipe here is for rendered chicken fat, which is widely used in Ashkenazi Jewish cuisine. (The Yiddish word for it—schmaltz—has taken on a whole other connotation in American English.)

As much as we love cream, butter, and olive oil, rendered fat is sometimes a better choice for use in a sauce or as a complement to meats because it does not distract from the flavor of the other ingredients. We use our Modernist schmaltz to enrich chicken sauce, salad dressing, and garlic, but it has innumerable applications—you can even use it to fry eggs!

Buy chicken skin from your butcher, or collect scraps of fat and skin from other chicken recipes in the freezer until you have enough to render. Note that the same technique can be used for any animal fat, including turkey, duck, or goose skin, and fatty trimmings from cuts of pork, veal, or beef.

– Adapted from Modernist Cuisine at Home

MCAH Pressure-rendered chicken fat

Step 1 divide and seal

In step 1, combine, and divide equally into two 500 mL / 16 oz canning jars.

Step 3 pressure cook

Tighten the lids fully, and then unscrew them one-quarter turn so that they do not explode.

Tips & Substitutions

  • We use canning jars inside the pressure cooker because it simplifies cleanup, and we aren’t usually rendering more fat than will fit in a couple jars. But you can render a large batch by putting 2.5 cm / 1 in of water in the pressure cooker, and then adding the ground skin. The pressure cooker should be no more than two-thirds full.
  • Removing a pressure cooker’s lid while its contents are hot can splatter boiling water or food all over the kitchen—or you. Before opening the cooker, let it cool, or run tepid water over the rim, to depressurize it. The pressure valve will sink down fully when the cooker is safe to open.
  • For Passover, you can substitute schmaltz for oil in matzo ball recipes, use it to make matzo brei, and add it to your chicken soup to enhance flavor.

 Variations:

  • To wet render, drop the skin or fat into boiling water, and reduce it until all that is left are pieces of meat and tissue floating in bubbling fat. Strain. Discard the solids. Allow the liquid to separate, and then pour the warm fat off the top.
  • To dry render, sauté the skin or fat over low heat until the fat melts. The cooking causes Maillard reactions that enhance the flavor of the rendered fat. Dry-rendered fat keeps for several weeks in the refrigerator. This method works particularly well with fatty bacon.


Caramelized Pumpkin Pie

Caramelized Pumpkin Pie

Pumpkin pie is one of the most popular Thanksgiving desserts; therefore we devoted some time to analyzing what makes this pie so easy to identify. It’s typically the spices you taste, not the pumpkin, so we came up with a way to extract the true taste of pumpkin while skipping the spices, at least in the custard itself.

Blog_Pumpkin Pie_205152

We decided to source one of our own recipes from Modernist Cuisine, wherein we pressure-cook carrots with baking soda. Baking soda deepens flavors and enhances caramelization of sugars, which, we concluded, would be the perfect way to accentuate the pumpkin’s essence. But it required finding the best pumpkin for the job. We settled on a type of pumpkin that comes in the shape of a can—it’s soft inside and practically pureed, with a label that says “Libby’s.” For pumpkin-flavored pumpkin, it’s our first choice.

—Francisco Migoya, Head Chef

2014-11-11-Pie-Blog20488_forEVER

Pumpkin Pie Recipe

Blog_Pumpkin Pie_201572

Step 3: The dough should form unevenly-sized chunks, known as a shaggy mass.

Blog_Pumpkin Pie_201982

Step 6: After rolling dough into a thin disc, fold it in thirds.

Blog_Pumpkin Pie_202042

Step 6: Rotate dough 90 degrees, roll it gently, and fold it in thirds again to create a square mass.

Blog_Pumpkin Pie_203582

Step 8: As you line your pie tin with dough, press firmly against all surfaces of the tin, making sure that the edge between the bottom and side of the tin is covered.

Blog_Pumpkin Pie_203632

Step 8: We use a paring knife to tightly trim off excess pie dough.

Blog_Pumpkin Pie_203692

Step 8: To crimp, pinch the dough between your index finder and thumb, gently applying pressure.

Blog_Pumpkin Pie_202102

Step 11: We’ve found that can openers are best for opening Libby’s pumpkin puree.

Tips & Substitutions

Make in Advance:

  • The dough can be made six weeks ahead of time and then frozen until needed. The filling can be made up to four days in advance and refrigerated until needed. We recommend assembling your pie the morning of your dinner so that it has time to cool and set completely.


For the Dough:

  • Keep your ingredients, dough paddle, and mixing bowl cold for as long as possible. We keep our cubed butter and water refrigerated, and we store our flour (packaged in a zip-top bag), dough paddle, and mixing bowl in the freezer until we are ready to begin the dough.
  • In step 2, the butter cubes should be thoroughly coated in flour. The coating prevents the development of a mealy dough texture and the butter from clumping together in step 4.
  • Over-mixing the ingredients can affect your results when your pie bakes. In step 2, the butter and flour should be mixed until the butter is about the size of a chickpea. After adding the water in step 3, mix the dough until the flour is no longer visible, but before a solid mass of dough has formed around the paddle. The dough should form unevenly-sized chunks, known as a shaggy mass.
  • After removing the dough from the mixer in step 5, we recommend compressing the dough by hand into two discs to prevent over mixing. Look for large pieces of butter in your dough—those chunks are the key to a flaky crust.
  • The technique in Step 6 is similar to laminating croissant dough. The folds create flaky layers when the pie bakes.
  • Before lining your pie pan with dough, give the dough about 20 minutes to relax. It’s an extra step, but we find that the additional time prevents the dough from shrinking as you press it into the pie pan.
  • We like to transfer our relaxed dough into the pie pan by lightly folding the dough into fourths, so that the shape resembles a flat ice-cream cone. The shape makes thin doughs easier to manage.
  • To crimp your crust, pinch the dough between your index finger and thumb, gently applying pressure to create divots. You can also use the tip of a fork to create a crimp pattern.
  • Don’t throw away the excess pie trimmings! Toss your scraps in cinnamon and sugar, and then bake them in the oven next to your pie. The trimmings will puff up, similar to pastries, and are the perfect size for snacking.


For the Whipped Crème Fraîche:

  • If possible, use a cake stand that spins. As you pipe the whipped crème fraîche, keep the bag still and spin just the stand, working in a spiral from the inside out.


For the Assembly:

  • For the egg wash, combine one egg, one egg yolk, a splash of milk, and a pinch of salt in a small bowl. We recommend using baking stones to bake pies. Stones provide better heat distribution, which will prevent the middle of the pie shell from becoming soggy.
  • Keep an eye on your pie as it bakes—there are two visual cues that indicate when the pie is done. When your timer goes off, open your oven, don your kitchen mitts, and give the pan a nudge. As you move the pan, the finished pie should demonstrate what head chef Francisco Migoya calls a “gelatinous jiggle.” The middle of the pie should gently bounce up and down while the perimeter of the filling remains motionless. If you nudge the pie and the filling ripples, or still resembles a liquid, it needs more time.
  • The pie filling will also develop a slight dome shape when it’s ready, similar to a soufflé. Once you remove the pie from the oven, the dome will fall.

Pressure-Cooked Chicharrón

Pressure-Cooked Chicharrón

It’s hard to miss the fanfare (or better yet, 12th-manfare) around Seattle right now—the Space Needle glows green at night and enormous 12s can be spotted along the skylines of Seattle and Bellevue, just across Lake Washington. Whether you’re a fan of the Seahawks, Patriots, or the commercials (or biding your time until next year), there’s one thing we can all get excited about: game day snacks. This year, we’re honoring the old pigskin with . . . pig skin. Pressure-Cooked Chicharrón to be exact.

Step 5 deep fry

Chicharrón is pork skin that has been dehydrated, fried, and puffed into crackling. It’s an addictive snack or garnish: make plenty, or it might disappear before it gets to the table. Pork skin is available from many butchers and at many Asian and Latin American markets.

The key to good chicharrón is drying the skin by just the right amount before frying it. The dried pieces should at that point flex slightly, and then snap in half. If they are too moist or too dry, they will not puff properly in the hot oil. Proper inflation is essential to good chicharrón. A food dehydrator is the best tool for drying the skin, but if you don’t have one, preheat the oven to its lowest temperature setting, arrange the pieces on a rack set over a baking sheet, and dry them for 8–10 hours until they become leathery and flexible.

Crispy Pork Chicharron Final

We like chicharrón with guacamole and salsa; however, if you truly want to win your Super Bowl party, make campechanas: tacos of corn tortillas filled with equal parts carnitas and chicharrón, topped with your favorite green chili salsa.

– Adapted from Modernist Cuisine at Home

Pressure-Cooked Chicharron

Step 1 remove fat

For step 4, use a butter knife to gently scrape the fat from the cooled skin.

Step 2 dehydrate

If you’re drying the skin without a dehydrator, preheat your oven to the lowest setting, arrange pieces on a baking sheet, and dry until they become leathery and flexible, 8-10 hours.

Tips & Substitutions

  • In step 4, use a butter knife or other utensil to gently scrape the fat from the cooled skin. Take care not to tear the skin.
  • When choosing a neutral oil, choose one that has a smoke point higher than the desired cooking temperature. Peanut, soybean, and sunflower oils are our favorites for frying at high temperatures.
  • Deep-fry food in enough oil that the food floats and does not touch the bottom of the pan.
  • For step 8, deep-fry the skin a few pieces at a time. Work in batches as needed.
  • Make it a feast. Check out our recipes for Pressure-Cooked Carnitas, Modernist Seven Layer Dip, Melty Queso Dip, and Pressure-Cooked Fresh-Corn Tamales.

Fish Brine

Fish Brine

Salt is not just a universal seasoning. It also has a powerful chemical ability to retain juices within fish and meat during cooking, provided you distribute the salt evenly throughout the meat at the proper concentration.

Slathering salt on the outside of a fish or a piece of meat doesn’t work very well, unless you want the distinctive flavor and firm, smooth texture of a cured meat, like corned beef or smoked salmon. At such high concentrations, salt actually causes the proteins in meat to fall apart.

MCAH_BASIC_FishStock_Final_IMG_2223 (2)

The subtler effect of brining is more widely useful. Brining is the technique of soaking meat in a dilute salt solution until the dissolved salt permeates the muscle tissue. You’re shooting for a final concentration of about 0.5% salt throughout the meat—weak compared to curing. The challenge with brining is getting the meat deep in the interior to be just as salty as the meat on the outside. Unless you know what you’re doing, it’s easy to end up with a steep gradient of saltiness.

Modernist brining, akin to cooking sous vide, soaks the meat for long periods (up to 24 hours) in a solution having a salt concentration only slightly higher than that target of 0.5%. The risk of oversalting is eliminated. Brining fish prior to cooking will season it, firm it, and protect its delicate color.

– Adapted from Modernist Cuisine at Home

Recipe Tags

Brine, Easy Difficulty, Fish

MCAH Fish Brine

Tips & Substitutions

  • Warm water dissolves the salt and sugar more quickly. Allow warm brine to cool completely before adding it to the fish.
  • If you have time, decrease the salt to 20 g and the sugar to 15 g, and brine the fish for 24 hours—the effect is even gentler.
  • Brined fish should be cooked immediately.
  • Brining prevents the albumin in salmon from leaching to the surface and masking the beautiful orange-red pigment with an opaque whitish color.
  • Use this brine to make our Sous Vide Salmon in the Kitchen Sink,  Fragrant Sous Vide Salmon or before preparing your favorite fish recipes.
  • We like to add kombu seaweed, toasted coriander seeds, and lemon zest to the brine to add even more flavor. Our Seaweed Fish Brine recipe can be pound on p. 133 of Modernist Cuisine at Home.

چه زمانی رابطه جنسی ممنوع می باشد؟


از نظر طب سنتی بهتر است در این مواقع نزدیکی جنسی نداشته باشید

سید جواد علوی درباره تدبیر جماع یا نزدیکی جنسی اظهار کرد: جماع یا نزدیکی جنسی از مهمترین راه‌های پاکسازی بدن و جزء سته ضروریه سلامتی است.

به گفته وی نزدیکی جنسی طبیعی باعث سرحال شدن, احساس سبکی, رفع وسواس و اندیشه بد می‌شود، همچنین عدم نزدیکی جنسی موجب تپش قلب, تب, سرگیجه, احساس سنگینی در بدن می‌شود.

نزدیکی جنسی در برخی از اوقات مناسب نیست

-نزدیکی جنسی هنگام گرسنگی و بعد از غذا خوردن و مصرف نوشیدنی مناسب نیست.

-نزدیکی جنسی بعد از ورزش, پس از حمام , پس از فعالین سنگین مناسب نیست.

-نزدیکی جنسی پس از شادی زیاد یا غم زیاد نیز مناسب نیست.

علائمی که نشان می‌دهد نزدیکی جنسی زیان آور است:

-احساس لرز و سرما یا لرزش بدن هنگام نزدیکی جنسی

-احساس نوعی درد و رنج در اندام‌های بدن

این کارشناس طب سنتی ادامه داد: اگر چنین علائمی در خود احساس کردی بهتر است که یک هفته از نزدیکی بپرهیزید و غذاهای مفید و با کیفیت مصرف کنید.

علوی بیان داشت: البته از دیدگاه طب سنتی افرادی که تنومند و هیکلی هستند از نزدیکی جنسی زیان کمتری می‌بینند و افرادی که خیلی لاغر هستند و دارای مزاج سرد و خشک‌اند از نزدیکی جنسی بسیار آسیب می‌بینند. افراد گرم مزاج از نزدیکی جنسی سود بیشتری می‌برند.

وی ادامه داد: نزدیکی جنسی بیش از اندازه موجب ضعف و غلبه سردی در بدن می‌شود و افراد سرد مزاج بیشتر از یک بار در هفته نزدیکی جنسی نداشته باشند.

این کارشناس طب سنتی خاطرنشان کرد: نزدیکی با شکم پر موجب ضعف معده خواهد شد و بهتر است که 2 تا 3 ساعت بعد از غذا باشد.


فروش ویژه آموزش صفر تا صد برنامه نویسی اندروید با Android Studio


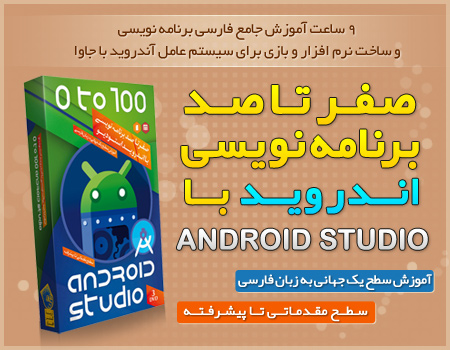
صفر تا صد برنامه نویسی اندروید با Android Studio. آموزش ساخت نرم افزار و بازی اندروید با جاوا در محیط Android Studio. آموزش سطح یک جهانی به زبان فارسی. سطح مقدماتی تا پیشرفته ...
اندروید استودیو یک محیط برنامه نویسی و استودیو فوق العاده جهت برنامه نوسی است که بطور اختصاصی برای اندروید طراحی شده و امکانات و ویژگی های بسیار زیادی را در اختیار برنامه نویسان ویژه اندروید قرار می دهد.
در مجموعه های آموزشی "صفر تا صد برنامه نویسی اندروید" بر آن شدیم تا هرآنچه در دنیای برنامه نویسی اندروید هست را به شما معرفی کنیم و آموزش دهیم. پس با ما همراه باشید ...

روش خرید: برای خرید پس از کلیک روی دکمه زیر و تکمیل فرم سفارش، ابتدا محصول مورد نظر را درب منزل یا محل کار تحویل بگیرید، سپس وجه کالا و هزینه ارسال را به مامور پست بپردازید. جهت مشاهده فرم خرید، روی دکمه زیر کلیک کنید.

قیمت: 24800 تومان

فروش ویژه شمع ال ای دی 12 رنگ - Luma Candles


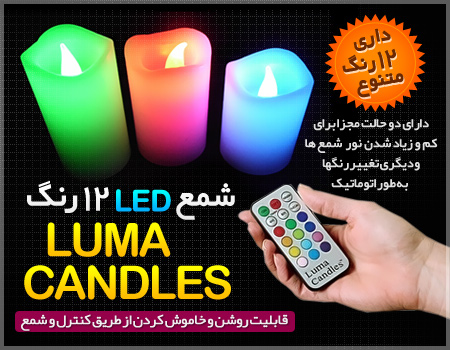
شمع ال ای دی 12 رنگ Luma Candles. فوق العاده شیک با ماندگاری دائمی. قابلیت روشن و خاموش کردن از طریق کنترل (از راه دور) و از طریق خود شمع.
شمع های لوما کندل Luma Candles محصول جدید و جالبی است که کاربرد بسیار دارد و زیبایی بخش منزل، دفتر کار، اتاق خواب و مهمانی های شماست. شمع های لوما کندل Luma Candles دائمی بوده و دارای رنگ های زیبا و متنوع (12 رنگ) می باشد که می توانید آنها را به دلخواه با استفاده از کنترل (از راه دور) تغییر دهید، با وجود این شمع دائمی، دیگر نیاز به خرید تعداد زیادی شمع با رنگ های متفاوت نیست. شمع لوما کندل با داشتن رنگ های متفاوت و دلنشین می تواند جایگزین مناسبی برای شمع های معمولی باشد، این محصول دارای آپشن های زیادی از جمله : تغییر رنگ ها به طور تک رنگ، تغییر رنگها به صورت اتوماتیک، کم و زیاد شدن نورها، تنظیم هر شمع به یک رنگ جداگانه و … می باشد. هر پکیج از شمع لوما کندل دارای 3 شمع در سایز های مختلف است.

روش خرید: برای خرید پس از کلیک روی دکمه زیر و تکمیل فرم سفارش، ابتدا محصول مورد نظر را درب منزل یا محل کار تحویل بگیرید، سپس وجه کالا و هزینه ارسال را به مامور پست بپردازید. جهت مشاهده فرم خرید، روی دکمه زیر کلیک کنید.

قیمت: 49000 تومان

فروش ویژه اسپیکر بلوتوثی اتومبیل Safe Car


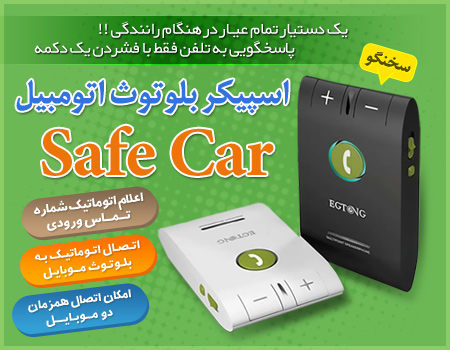
اسپیکر بلوتوثی اتومبیل Safe Car، اتصال اتوماتیک به موبایل از طریق بلوتوث. یک دستگاه تمام عیار برای پاسخگویی در هنگام رانندگی، اعلام اتوماتیک شماره تماس ورودی (سخنگو) ...
شما می توانید به آسانی موبایل خود را از طریق بلوتوث به این اسپیکر متصل کنید و در هنگام تماس تلفنی، تنها با فشردن یک دکمه بدون نیاز به برداشتن موبایل در دست به تلفن خود پاسخ دهید. صدای مخاطب از طریق بلندگوی تعبیه شده در این دستگاه در اتومبیل شما پخش می شود و با استفاده از میکروفونی که در داخل این دستگاه تعبیه شده است صدای شما به مخاطب خواهد رسید و امکان صحبت کردن دو طرفه را برای شما فراهم خواهد ساخت.
دکمه کم و زیاد کردن صدا در دستگاه،‌ به شما کمک می کند صدای مخاطب را کم یا زیاد کنید. از دیگر ویژگی های Safe Car پخش موزیک اجرایی توسط موبایل در اسپیکر این دستگاه می باشد. همچنین قطعه ای آهنربایی برای اتصال دستگاه Safe Car به آفتابگیر ماشین در نظر گرفته شده است. باطری این دستگاه شارژی بوده و قابل شارژ با استفاده از کابل USB (با استفاده از کامپیوتر و لپ تاپ) و همچنین فندکی اتومبیل می باشد.

روش خرید: برای خرید پس از کلیک روی دکمه زیر و تکمیل فرم سفارش، ابتدا محصول مورد نظر را درب منزل یا محل کار تحویل بگیرید، سپس وجه کالا و هزینه ارسال را به مامور پست بپردازید. جهت مشاهده فرم خرید، روی دکمه زیر کلیک کنید.

قیمت: 88000 تومان